Securing ASP.NET Core 7 APIs: Automation with Middleware and Decorator

Hello everyone, I hope you’re having a great day! In this blog, we’re diving deep into the world of authorization in ASP.NET Core 7 projects. Authorization is a pivotal component in securing your applications, and today, we’ll focus on implementing it using JSON Web Tokens (JWT).
Why Authorization Matters
Authorization is the gatekeeper of your application, ensuring that only authenticated and authorized users can access certain parts or perform specific actions. To achieve this, we’re harnessing the power of JSON Web Tokens (JWT).
What Exactly is JWT?
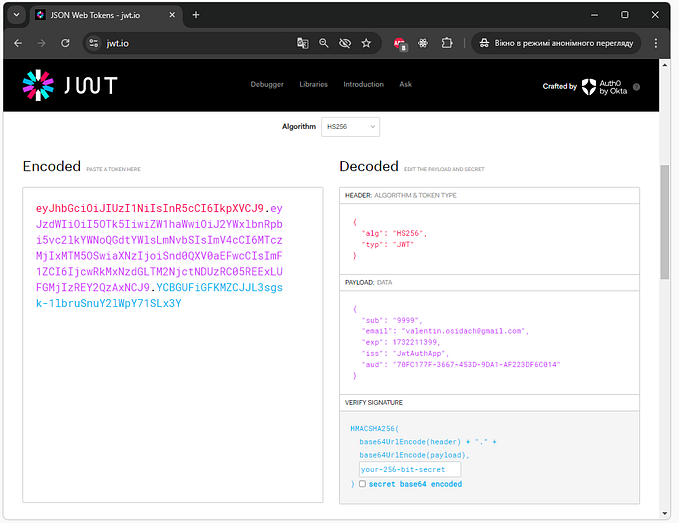
JSON Web Token, or JWT for short, is a compact and self-contained way to securely transmit information between parties as a JSON object. It’s commonly used for securely exchanging claims between the client and server. JWTs consist of three parts: a header, a payload, and a signature. These tokens are digitally signed to guarantee their authenticity.
Now, let’s dive into the code to set up JWT authorization in your ASP.NET Core 7 project. Assuming you’ve already created your project, let’s proceed with configuring JWT.
JWT Configuration
First things first, we need to install the Microsoft.AspNetCore.Authentication.JwtBearer package. Open your project's directory and run this command:
dotnet add package Microsoft.AspNetCore.Authentication.JwtBearerThis package is essential for handling JWT-based authentication and authorization in your ASP.NET Core project.
Next, let’s add another essential package, dotenv.net:
dotnet add package dotenv.netNow, let’s start with the JWT setup part in your project.
1. Create a .env File
Create a .env file in the root directory of your project and add the following variables:
JWT_ISSUER=Akash
JWT_AUDIENCE=User
JWT_SECRET=thisissecretkeyexampl
2. Configure JWT in Program.cs
In your Program.cs, add the following code snippet:
// your application namespaces here

using Microsoft.AspNetCore.Authentication.JwtBearer;
using Microsoft.IdentityModel.Tokens;
using Microsoft.AspNetCore.Authorization;
using dotenv.net;

var builder = WebApplication.CreateBuilder(args);

DotEnv.Load();

// JWT Configuration
builder.Services.AddAuthentication(options =>
{
    options.DefaultAuthenticateScheme = JwtBearerDefaults.AuthenticationScheme;
    options.DefaultChallengeScheme = JwtBearerDefaults.AuthenticationScheme;
})
.AddJwtBearer(options =>
{
    options.RequireHttpsMetadata = false;
    options.SaveToken = true;
    options.TokenValidationParameters = new TokenValidationParameters
    {
        ValidateIssuerSigningKey = true,
        ValidIssuer = Environment.GetEnvironmentVariable("JWT_ISSUER"),
        ValidAudience = Environment.GetEnvironmentVariable("JWT_AUDIENCE"),
        IssuerSigningKey = new SymmetricSecurityKey(Encoding.UTF8.GetBytes(Environment.GetEnvironmentVariable("JWT_SECRET")!)),
        ClockSkew = TimeSpan.Zero
    };
});

// Configure the default authorization policy
builder.Services.AddAuthorization(options =>
{
    options.DefaultPolicy = new AuthorizationPolicyBuilder()
            .AddAuthenticationSchemes(JwtBearerDefaults.AuthenticationScheme)
            .RequireAuthenticatedUser()
            .Build();

});

// Rest of your application service configuration...

var app = builder.Build();

// Rest of your application configuration...
app.UseAuthentication();

app.UseAuthorization();

app.Run();
3. Implement a JWT Helper
To streamline the generation and validation of JWT tokens throughout your application, let’s create a dedicated JWT helper. Follow these steps:
- Create a folder named
Helpersin your project directory. - Inside the
Helpersfolder, create a file namedJwtSecurityTokenHandlerWrapper.cs.
Here’s a sample implementation of the JwtSecurityTokenHandlerWrapper class:
using System.IdentityModel.Tokens.Jwt;
using System.Security.Claims;
using System.Text;
using Microsoft.IdentityModel.Tokens;

namespace YourProjectNamespace.Helpers; // Replace with your project's namespace

public class JwtSecurityTokenHandlerWrapper
{
    // Create an instance of JwtSecurityTokenHandler
    private readonly JwtSecurityTokenHandler _jwtSecurityTokenHandler;

    public JwtSecurityTokenHandlerWrapper()
    {
        _jwtSecurityTokenHandler = new JwtSecurityTokenHandler();
    }

    // Generate a JWT token based on user ID and role
    public string GenerateJwtToken(string userId, string role)
    {
        // Retrieve the JWT secret from environment variables and encode it
        var key = Encoding.ASCII.GetBytes(Environment.GetEnvironmentVariable("JWT_SECRET")!);

        // Create claims for user identity and role
        var claims = new List<Claim>
            {
                new Claim(ClaimTypes.NameIdentifier, userId),
                new Claim(ClaimTypes.Role, role)
            };

        // Create an identity from the claims
        var identity = new ClaimsIdentity(claims);

        // Describe the token settings
        var tokenDescriptor = new SecurityTokenDescriptor
        {
            Issuer = Environment.GetEnvironmentVariable("JWT_ISSUER"),
            Audience = Environment.GetEnvironmentVariable("JWT_AUDIENCE"),
            Subject = identity,
            Expires = DateTime.UtcNow.AddMinutes(30),
            SigningCredentials = new SigningCredentials(new SymmetricSecurityKey(key), SecurityAlgorithms.HmacSha256Signature)
        };

        // Create a JWT security token
        var token = _jwtSecurityTokenHandler.CreateJwtSecurityToken(tokenDescriptor);

        // Write the token as a string and return it
        return _jwtSecurityTokenHandler.WriteToken(token);
    }

    // Validate a JWT token
    public ClaimsPrincipal ValidateJwtToken(string token)
    {
        // Retrieve the JWT secret from environment variables and encode it
        var key = Encoding.ASCII.GetBytes(Environment.GetEnvironmentVariable("JWT_SECRET")!);

        try
        {
            // Create a token handler and validate the token
            var tokenHandler = new JwtSecurityTokenHandler();
            var claimsPrincipal = tokenHandler.ValidateToken(token, new TokenValidationParameters
            {
                ValidateIssuerSigningKey = true,
                ValidIssuer = Environment.GetEnvironmentVariable("JWT_ISSUER"),
                ValidAudience = Environment.GetEnvironmentVariable("JWT_AUDIENCE"),
                IssuerSigningKey = new SymmetricSecurityKey(key)
            }, out SecurityToken validatedToken);

            // Return the claims principal
            return claimsPrincipal;
        }
        catch (SecurityTokenExpiredException)
        {
            // Handle token expiration
            throw new ApplicationException("Token has expired.");
        }
    }
}
4. Securing API Endpoints with JWT Authentication
With JWT configuration in place, you can enhance the security of your API endpoints. Utilize the JWT token for both validation and seamless retrieval of the user’s ID as demonstrated below:
[HttpGet(Name = "UserDetails")]
[Authorize]
public ActionResult<string> UserDetails()
{
    Dictionary<int, string> userDictionary = new Dictionary<int, string>
        {
            { 1, "Akash" },
            { 2, "John" },
            { 3, "Alice" }
        };
    try
    {
        // Extract the JWT (Json Web Token) from the Authorization header of the HTTP request.
        var token = Request.Headers["Authorization"].ToString().Replace("Bearer ", "");

        // Validate the JWT and retrieve claims about the user.
        var claimsPrincipal = _jwtSecurityTokenHandler.ValidateJwtToken(token);

        // Check if the user is authenticated. If not, return an unauthorized response.
        if (claimsPrincipal?.Identity?.IsAuthenticated != true)
        {
            return Unauthorized("Token has expired.");
        }
        // Extract the user's ID from the JWT claims.
        int userId = int.Parse(claimsPrincipal.FindFirst(ClaimTypes.NameIdentifier)?.Value!);

        // Check if the user ID exists in the dictionary.
        if (userDictionary.ContainsKey(userId))
        {
            string userName = userDictionary[userId];
            return $"Hello {userName}";
        }
        else
        {
            throw new NotFoundException("User not found");
        }
    }
    catch (SecurityTokenExpiredException)
    {
        return Unauthorized("Token has expired.");
    }

}
Now that we’ve covered JWT authorization for your API, let’s explore the path of clean code and efficiency. You’ve likely encountered a recurring challenge across various APIs — the need for extensive conditional code to validate and extract JWT token keys. Imagine dealing with numerous APIs and having to repeat this task repeatedly. It’s high time we simplify and automate this process.
Automating JWT Token Validation and Retrieval
When it comes to automating JWT token validation and retrieval, you have two powerful architectural patterns at your disposal: Middleware and Decorator. The choice between them hinges on your specific requirements. Both Middleware and the Decorator pattern offer their merits. If your goal is to enforce this behavior universally across all controllers and actions, Middleware presents a straightforward and harmonious fit within the ASP.NET Core’s authentication middleware framework. However, if the need arises to tailor this behavior to particular controllers or actions, the Decorator pattern emerges as the more flexible solution.
Automating JWT with Middleware
Let’s initiate the process by automating JWT Token Validation and Retrieval using Middleware.
- Implement a JWT Middleware
- Create a folder named
Middlewaresin your project directory. - Inside the
Middlewaresfolder, create a file namedJwtMiddleware.cs.
using Microsoft.IdentityModel.Tokens;
using System.Security.Claims;

namespace YourProjectNamespace.Middlewares; // Replace with your project's namespace

public class JwtMiddleware : IMiddleware
{
    private readonly JwtSecurityTokenHandlerWrapper _jwtSecurityTokenHandler;

    public JwtMiddleware(JwtSecurityTokenHandlerWrapper jwtSecurityTokenHandler){
        _jwtSecurityTokenHandler = jwtSecurityTokenHandler;
    }
    public async Task InvokeAsync(HttpContext context, RequestDelegate next)
    {
        // Get the token from the Authorization header
        var token = context.Request.Headers["Authorization"].ToString().Replace("Bearer ","");

        if(!token.IsNullOrEmpty()){

            try
            {
                // Verify the token using the JwtSecurityTokenHandlerWrapper
                var claimsPrincipal = _jwtSecurityTokenHandler.ValidateJwtToken(token);

                // Extract the user ID from the token
                var userId = claimsPrincipal.FindFirst(ClaimTypes.NameIdentifier)?.Value;

                // Store the user ID in the HttpContext items for later use
                context.Items["UserId"] = userId;

                // You can also do the for same other key which you have in JWT token.
            }
            catch (Exception)
            {
                // If the token is invalid, throw an exception
                context.Result = new UnauthorizedResult();
            }


        }
        // Continue processing the request
        await next(context);
    }
}
2. Configure JWT Middleware in Program.cs
In your Program.cs, add the following code snippet:
// Rest of your application namespaces here...
global using YourProjectNamespace.Helpers; // Change with your namespace here
global using YourProjectNamespace.Middlewares; // Change with your namespace here

using Microsoft.AspNetCore.Authentication.JwtBearer;
using Microsoft.AspNetCore.Authorization;
using Microsoft.IdentityModel.Tokens;
using dotenv.net;

var builder = WebApplication.CreateBuilder(args);

DotEnv.Load();

// JWT Configuration
builder.Services.AddAuthentication(options =>
{
    options.DefaultAuthenticateScheme = JwtBearerDefaults.AuthenticationScheme;
    options.DefaultChallengeScheme = JwtBearerDefaults.AuthenticationScheme;
})
.AddJwtBearer(options =>
{
    options.RequireHttpsMetadata = false;
    options.SaveToken = true;
    options.TokenValidationParameters = new TokenValidationParameters
    {
        ValidateIssuerSigningKey = true,
        ValidIssuer = Environment.GetEnvironmentVariable("JWT_ISSUER"),
        ValidAudience = Environment.GetEnvironmentVariable("JWT_AUDIENCE"),
        IssuerSigningKey = new SymmetricSecurityKey(Encoding.UTF8.GetBytes(Environment.GetEnvironmentVariable("JWT_SECRET")!)),
        ClockSkew = TimeSpan.Zero
    };
});

// Configure the default authorization policy
builder.Services.AddAuthorization(options =>
{
    options.DefaultPolicy = new AuthorizationPolicyBuilder()
            .AddAuthenticationSchemes(JwtBearerDefaults.AuthenticationScheme)
            .RequireAuthenticatedUser()
            .Build();

});

// Add the global scope for JwtSecurityTokenHandlerWrapper.
builder.Services.AddScoped<JwtSecurityTokenHandlerWrapper>();

// Rest of your application service configuration...


var app = builder.Build();

app.UseMiddleware<JwtMiddleware>(); // JWT Middleware configuration

// Rest of your application configuration...
app.UseAuthentication();

app.UseAuthorization();

app.Run();
Now, with this Middleware in place, your API code becomes much cleaner, shorter, and easier to understand.
API code example:
[HttpGet(Name = "UserDetails")]
[Authorize]
public ActionResult<string> UserDetails()
{
    Dictionary<int, string> userDictionary = new Dictionary<int, string>
        {
            { 1, "Akash" },
            { 2, "John" },
            { 3, "Alice" }
        };
    int userId = int.Parse(HttpContext.Items["UserId"]?.ToString()!);
    if (userDictionary.ContainsKey(userId))
    {
        string userName = userDictionary[userId];
        return $"Hello {userName}";
    }
    else
    {
        throw new NotFoundException("User not found");
    }

}
You can see how much cleaner and more understandable the API code becomes with Middleware.
Now, let’s explore the Decorator pattern.
Automating JWT with Decorator
Before we dive into the code, it’s important to note that we’re not creating a brand-new decorator. Instead, we’re building upon the existing [Authorize] attribute to improve its capabilities by adding data validation and retrieval filters.
- Adding a JWT Filter Decorator to [Authorize]
- Create a folder named
Decoratorsin your project directory. - Inside the
Decoratorsfolder, create a file namedJwtAuthorizeFilter.cs.
using Microsoft.AspNetCore.Authorization;
using Microsoft.AspNetCore.Mvc;
using Microsoft.AspNetCore.Mvc.Filters;
using System.Security.Claims;

namespace YourProjectNamespace.Decorators; // Replace with your project's namespace
public class JwtAuthorizeFilter : IAuthorizationFilter
{
    private readonly JwtSecurityTokenHandlerWrapper _jwtSecurityTokenHandler;

    public JwtAuthorizeFilter(JwtSecurityTokenHandlerWrapper jwtSecurityTokenHandler){
        _jwtSecurityTokenHandler = jwtSecurityTokenHandler;
    }

    public void OnAuthorization(AuthorizationFilterContext context)
    {
        // Check if the [Authorize] attribute is explicitly applied to the action or controller.
        var hasAuthorizeAttribute = context.ActionDescriptor.EndpointMetadata
            .Any(em => em is AuthorizeAttribute);

        if (hasAuthorizeAttribute)
        {
            var token = context.HttpContext.Request.Headers["Authorization"].ToString().Replace("Bearer ", "");

            if (!string.IsNullOrEmpty(token))
            {
                try
                {
                    // Validate the token and extract claims
                    var claimsPrincipal = _jwtSecurityTokenHandler.ValidateJwtToken(token);

                    // Extract the user ID from the token
                    var userId = claimsPrincipal.FindFirst(ClaimTypes.NameIdentifier)?.Value;
                    context.HttpContext.Items["UserId"] = userId;
                }
                catch (Exception)
                {
                    context.Result = new UnauthorizedResult();
                }
            }
            else
            {
                context.Result = new UnauthorizedResult();
            }
        }
    }

}
2. Configure JWT Filter Decorator in Program.cs
In your Program.cs, add the following code snippet:
// Rest of your application namespaces here...
global using YourProjectNamespace.Helpers; // Change with your namespace here
global using YourProjectNamespace.Decorators; // Change with your namespace here

using Microsoft.AspNetCore.Authentication.JwtBearer;
using Microsoft.AspNetCore.Authorization;
using Microsoft.IdentityModel.Tokens;
using dotenv.net;

var builder = WebApplication.CreateBuilder(args);

DotEnv.Load();

// JWT Configuration
builder.Services.AddAuthentication(options =>
{
    options.DefaultAuthenticateScheme = JwtBearerDefaults.AuthenticationScheme;
    options.DefaultChallengeScheme = JwtBearerDefaults.AuthenticationScheme;
})
.AddJwtBearer(options =>
{
    options.RequireHttpsMetadata = false;
    options.SaveToken = true;
    options.TokenValidationParameters = new TokenValidationParameters
    {
        ValidateIssuerSigningKey = true,
        ValidIssuer = Environment.GetEnvironmentVariable("JWT_ISSUER"),
        ValidAudience = Environment.GetEnvironmentVariable("JWT_AUDIENCE"),
        IssuerSigningKey = new SymmetricSecurityKey(Encoding.UTF8.GetBytes(Environment.GetEnvironmentVariable("JWT_SECRET")!)),
        ClockSkew = TimeSpan.Zero
    };
});

// Configure the default authorization policy
builder.Services.AddAuthorization(options =>
{
    options.DefaultPolicy = new AuthorizationPolicyBuilder()
            .AddAuthenticationSchemes(JwtBearerDefaults.AuthenticationScheme)
            .RequireAuthenticatedUser()
            .Build();

});

// Add the global scope for JwtSecurityTokenHandlerWrapper.
builder.Services.AddScoped<JwtSecurityTokenHandlerWrapper>();

// Configuration for [Authorize] attribute with custom filters
builder.Services.AddControllersWithViews(options =>{
    options.Filters.Add(typeof(JwtAuthorizeFilter));
});

// Rest of your application service configuration...


var app = builder.Build();

// Rest of your application configuration...
app.UseAuthentication();

app.UseAuthorization();

app.Run();
With this Decorator pattern in place, your API code remains the same as in the Middleware approach, becoming much cleaner, shorter, and easier to understand.
API code example:
[HttpGet(Name = "UserDetails")]
[Authorize]
public ActionResult<string> UserDetails()
{
    Dictionary<int, string> userDictionary = new Dictionary<int, string>
        {
            { 1, "Akash" },
            { 2, "John" },
            { 3, "Alice" }
        };
    int userId = int.Parse(HttpContext.Items["UserId"]?.ToString()!);
    if (userDictionary.ContainsKey(userId))
    {
        string userName = userDictionary[userId];
        return $"Hello {userName}";
    }
    else
    {
        throw new NotFoundException("User not found");
    }

}
That’s it for today. I hope this guide helps you secure your ASP.NET Core 7 applications effectively. If you have any questions or need additional code examples, please don’t hesitate to ask in the comments. If you found this blog helpful, please be sure to give it a clap. Happy coding!


